It is school holiday time here in NZ, so I thought for something a little different I'd share with you a fun activity - one I enjoyed from biology class in my own school days. Equally, curious adults might enjoy participating just as much!
You may remember a couple of previous posts that talked a little about some of the amazing visual capabilities of creatures like the
mantis shrimp. Well, today we are going to explore a little about our own vision and create our own map of our very own visual field.
You will need:
an A3 piece of paper (or two A4 pieces with their long edges taped together, but only tape it on one side as you'll need to write on the paper)
a selection of coloured pencils (or felt tip pens)
- a HB pencil
- a ruler
- a helper
- a piece of wall without pictures on it, furniture in front of it etc.
- blue tack, or some other means of affixing the paper to the wall
- a protractor (optional)
Instructions:
- Rule a bunch of lines radiating out to the edge of the paper from the centre dot. We made our lines at approximately 15 degree intervals, and I would suggest this as a minimum (it doesn't matter if they aren't exactly 15 degrees, so if you don't have a protractor its fine to just estimate). Lines that are closer together are fine, and will give a more accurate map of your visual field.
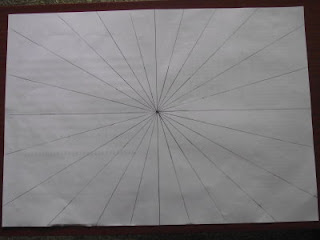 |
| Your piece of paper should now look like this... |
- Next attach the piece of paper to the wall, landscape orientation, so that when you stand against the wall, facing it, the tip of your nose is on the central dot.
- Give your helper the coloured pencils, and looking straight ahead with your nose touching the central dot, ask them to pick one pencil and starting at the edge of the paper, slide the pencil along one of the lines (you should not know which colour pencil they have or which line it is coming down).
- As soon as you can see the pencil, tell your helper to stop, and make a mark on the paper where the end of the pencil is. Repeat until each line has been used. For this first part of the map, the same pencil may be used on all the lines if you wish. Once there is a mark for each line, use a ruler to join them together. This will map the edge of your peripheral vision.
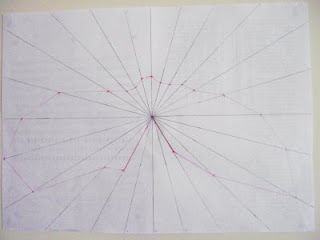 |
| The map of your peripheral visual field should look something like this...
|
The human retina consists of two different types of photoreceptor cells - rods and cones. There are some 120 million rods in the human retina that detect changes in light intensity, shape and movement. Rods are distributed across the surface of the retina and it is these cells we use in our peripheral vision. Rods allow us to see in low light conditions but because they are not sensitive to colour, we have a hard time seeing colour in such situations. The same is true with the coloured pencil. Because it is detected first by the rods in our peripheral vision, we see it without knowing what colour it is...
- Repeat the exercise in the bullet point above, but this time make sure your helper mixes up which colour pencil is being used (Your helper may reuse a pencil if they need to, but make sure you don't know what colour they are about to use). This time don't mark where you can first see the pencil, but where you are first able to tell what colour it is. This will map your colour visual field.
 |
| Your map should now look something like this... |
The area of your colour visual field should be smaller than the area of your peripheral vision. This is because the second type of photoreceptor - the cones - are sensitive to colour, but they are concentrated near the centre of the retina, so the pencil has to pass further into your visual field before you are able to detect its colour. Each of the 6 million cone cells in your retina is sensitive to one of three pigments (unless you are colour blind, in which case one or more pigments is missing) - blue, green or red, and it is the combination of those pigments being stimulated within the eye that allows us to see the whole array of colours we see. They allow us to see the scene in front of us in detail, while the rods in our peripheral vision allow us to detect to if something is going on there, e.g. movement, so we can then turn our head to focus on what was there in more detail.
- Finally, don't forget to swap places with your helper so that they can have a turn!


